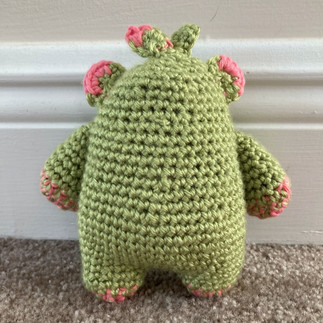
Little Green Bear Amigurumi
- Aidan Wells

- Jun 23, 2022
- 4 min read
Updated: Jul 11, 2022
This pattern will create an amigurumi "Little Green Bear" inspired by the TikTok filter of the same name. The original character that inspired the filter is called "Dooro Bear." If you like this pattern, feel free to leave a tip here!


DIFFICULTY LEVEL/SKILLS REQUIRED
Difficulty: Intermediate
You will need to know the following techniques:
Magic Circle
Crochet in the Round
Color Change
Increase
Decrease
MEASUREMENTS
The final product should measure 6" x 3.5"
GAUGE
5 sts and 5 rows of single crochet using a 3.75 mm hook = 1”x1” swatch
MATERIALS
YARN
1 skein Cotton Kings Cotton 8/8 - Light Pink (15)
1 skein Caron Simply Soft Yarn Solids in Chartreuse
The suggested yarns can be substituted for any color combination of DK weight.
**PLEASE NOTE: This pattern was designed to use up yarn leftover from a previous project,
therefore less than an entire 100g skein was used for each color**
HOOKS
3.75 mm (US F)
ADDITIONAL MATERIALS
Tapestry Needle
Stitch Marker
Black embroidery thread or yarn
Two 6mm safety eyes
Scissors
Polyfill or scrap yarn/fabric for stuffing
METHOD
ABBREVIATIONS
MC – Magic Circle
SL – Slip Stitch
SC – Single Crochet
INC – Increase
DEC – Decrease
PATTERN NOTES
Unless otherwise specified, the pattern is worked in the round.
The pattern will be worked in 5 parts: Main Body, Arms, Ears, Nose, Leaves.
The arms, ears, nose, and leaves will be attached to the main body using a whip stitch after it has been stuffed.
MAIN BODY
Leg 1
R1: Using color 1, make a MC, SC 7 into the MC, tighten (7)
R2: Bring in color 2.
Round 2 and 3 will be worked while holding color 1 and color 2 together.
INC in the next 7 SC (14)
R3: Holding both yarns, SC in the next 14 stitches (14)
R4: Drop color 1 and tie off
Using color 2, SC in the next 14 stitches (14)
R5: SC in the next 14 stitches using color 2. SL into the next stitch and tie off
Leg 2
Repeat R1-R4 from Leg 1
R5: SC in the next 14 stitches using color 2
CH 4 (18) Attach Leg 2 to Leg 1 using a slip stitch (See Photos Below)

R6: SC in the next 14 stitches (you should now be working in what was originally Leg 1)
When you reach the chains that connect the legs, SC once in the back bump of each chain
SC in the next 14 stitches (you should now be working in what was originally Leg 2)
When you reach the chains again, SC once in the front of each chain
(each chain stitch should now have a SC on either side)
The final stitch count for Round 6 should be (36)
R7: SC in the next 36 stitches (36)
R9: SC in the next 5 stitches, INC. Repeat until the end of the round (42)
R10: SC in the next 42 stitches (42)
R11: SC in the next 6 stitches, INC. Repeat until the end of the round (48)
R12-R16: SC in the next 48 stitches (48)
R17: SC in the next 6 stitches, DEC. Repeat until the end of the round (42)
R18-R20: SC in the next 42 stitches (42)
R21: SC in the next 5 stitches, DEC. Repeat until the end of the round (36)
R22-R26: SC in the next 36 stitches (36)
The eyes should be inserted between rows 23 and 24
R27: SC in the next 4 stitches, DEC. Repeat until the end of the round (30)
R28: SC in the next 30 stitches (30)
R29: SC in the next 3 stitches, DEC. Repeat until the end of the round (24)
R30: DEC in every stitch in the round (12)
R31: DEC in every stitch in the round (6). SL into the next stitch and tie off, leaving a long tail.
NOSE
R1 Using color 2, make a MC, SC 6 into the MC, tighten (6)
R2 INC in the next 2 stitches, SC in the next 3 stitches, INC in the next 2 stitches,
SC in the next 3 stitches (10)
R3 SC in the next 10 stitches, SL into the next stitch and tie off, leaving a long tail
Using black embroidery thread and an embroidery needle, embroider a nose and mouth onto the nose piece before attaching it to the body
ARM (x2)
R1 Using color 1, make a MC, SC 7 into the MC, tighten (7)
R2 Bring in color 2. Round 2 and 3 will be worked while holding color 1 and
color 2 together. INC in the next 7 SC (14)
R3 Holding both yarns, SC in the next 14 stitches (14)
R4 Drop color 1 and tie off. Using color 2, SC in the next 14 stitches (14)
R5-R6 SC in the next 14 stitches using color 2 (14)
R7 SC in the next 5 stitches, DEC, SC in the next 5 stitches, DEC (12)
R8 SC in the next 12 stitches (12)
R9 SC in the next 4 stitches, DEC, SC in the next 4 stitches, DEC (10)
R10 SC in the next 10 stitches, SL into the next stitch and tie off, leaving a long tail
EAR (x2)
R1 Using color 2, make a MC, SC 6 into the MC, tighten (6) CH 1 and turn
R2 Using color 2, SC in the first stitch, INC, then switch to color 1
Using color 1, INC in the next 2 stitches, then switch to color 2
Using color 2, INC in the next stitch, then SC in the final stitch (10)
Tie off and secure, leaving a long tail
LEAVES (x2)
R1 Using color 2, CH 4
Skip the first chain, and, working in the back bump, SC in the next two chains
In the final chain, SC 1, CH 2, SC 1
Working on the other side of the chain (see photos), SC in the back side of the next two
chains. Tie off and secure, leaving a long tail

ASSEMBLY
Before stuffing the main body, the eyes should be inserted and attached in between rounds 18 and 19 of the main body.
Each piece (ears, nose, arms, leaves) should be attached to the main body using a whip stitch. See photos below for placement.
The arms should be stuffed with polyfill or scrap yarn before attaching to the body.
The nose should be attached directly between the two eyes.

FINISHING
All tails can be hidden inside of the piece using tweezers.
Hey so the head of the bear, your finished item vs your written pattern there’s about 10 rows missing and the eyes in the pattern vs the placement of the eyes on the finished pattern don’t line up. You have photos for a more pear shaped bear but when actually done it’s very round and ball shaped