Crochet Blades
- Aidan Wells

- Jan 23
- 9 min read
I studied the blade. Be sure to tag me on instagram or tiktok. If you like this pattern, feel free to support me on my ko-fi!
DIFFICULTY LEVEL/SKILLS REQUIRED
Difficulty: Intermediate/Experienced
Maker should be comfortable with the following skills:
reading a color chart
color changes
handling multiple colors of yarn at once
MATERIALS
YARN
Weight 4, Any Brand
HOOK
4.00 mm
ADDITIONAL MATERIALS
E6000 glue
Stiff Felt
Scissors
Tapestry Needle
SHORT TUTORIALS
METHOD
ABBREVIATIONS
CH - Chain
SC - Single Crochet
ST(s) - Stitches
FSC - Foundation Single Crochet
PATTERN NOTES
The pattern uses US terminology
Each box in grid pattern represents one single crochet
The pattern is worked in rows unless otherwise stated
The pattern is worked from the bottom up.
The turning chain does not count as the 1st stitch of the row.
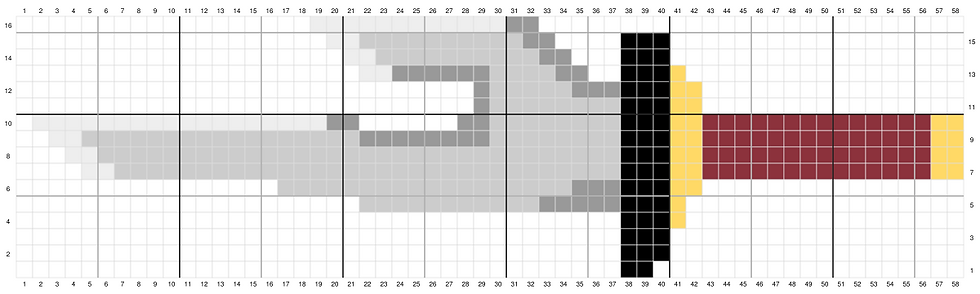
READING A GRAPH

Review the instructions for each sword BEFORE referencing the color chart.
Each will walk you through the shaping of your cutout tapestry. Each row of the written pattern coincides with the corresponding numbered row in the color chart. Please refer to the color chart for the placement of color changes.
MASTER SWORD

R0: Using a 4.0 mm hook and your darkest blue yarn, CH4
R1: Starting in the second chain from the hook, work a SC in each in the back bump of each ST across (3).
R2: CH1 and turn. INC in the first stitch, SC in each remaining stitch (4)
R3: CH1 and turn. INC in the first stitch, SC in each remaining stitch (5)
R4: CH1 and turn. INC in the first stitch, SC in each stitch until there are 2 remaining. DEC in the last two stitches (5)
R5: CH1 and turn. SC in each stitch until there are 2 remaining. DEC in the last two stitches (4)
R6-R17: CH1 and turn. SC in each stitch (4)
R18: CH1 and turn. SC in each stitch. At the end of the row, CH7 (4)
R19: Starting in the second chain from the hook, SC in each ST. Once you have reached the final stitch in the previous row, FSC 6 (16)
R20: CH1 and turn. SC in each stitch (16)
R21: CH1 and turn. INC in the first stitch, SC in each stitch until there is one ST remaining. INC in the last stitch (18)
R22: CH1 and turn. SC in each stitch (18)
R23: CH1 and turn. INC in the first stitch, SC in each stitch until there is one ST remaining. INC in the last stitch (20)
R24: CH1 and turn. SC in the first 5 stitches. Cut and reattach the yarn in the 5th stitch from the end of the row. SC in each remaining stitch. Cut and reattach the yarn in the 8th stitch. SC 6
R25: CH1 and turn. SC 6 (6)
R26: CH1 and turn. DEC in the first 2 STs. SC in each stitch until there are 2 remaining. DEC in the last two STs (4)
R27: CH1 and turn. SC in each stitch (4)
R28: CH1 and turn. INC in the first stitch, SC in each remaining stitch (5)
R29-R31: Repeat step R28 (8)
R32: CH1 and turn. SC in each stitch (8)
R33: CH1 and turn. SC in each stitch until there are 2 remaining. DEC in the last two stitches (7)
R34-R36: Repeat step R33 (4)
R37-R62: CH1 and turn. SC in each stitch (4)
R63: CH1 and turn. SC 2. DEC in the last two stitches (3)
R64: CH1 and turn. SC 1. DEC in the last two stitches (2)
R65: CH1 and turn. DEC. Cut and tie off (1)
INVERTED SPEAR OF HEAVEN
R0: Using a 4.0 mm hook and your black yarn, CH3
R1: Starting in the second chain from the hook, work a SC in each in the back bump of each ST across (2).
R2: CH1 and turn. SC in each stitch until there are 2 remaining. DEC in the last two stitches (3)
R3: CH1 and turn. SC in each stitch (3)
R4: CH1 and turn. SC in each stitch until there are 2 remaining. DEC in the last two stitches (4)
R5: CH1 and turn. SC in each ST. Once you have reached the final stitch in the previous row, FSC 16 (20). At the end of the row, CH6
R6: Starting in the second chain from the hook, SC in each ST until there is one stitch remaining. INC in the last stitch (26) At the end of the row, CH17
R7: Starting in the second chain from the hook, SC in each ST. Once you have reached the final stitch in the previous row, FSC 12 (54).
R8: CH1 and turn. INC in the first stitch. SC in each remaining stitch (55)
R9: CH1 and turn. SC in each ST until there is one stitch remaining. INC in the last stitch (26)
R10: CH1 and turn. INC in the first stitch. SC 18. Cut and reattach the yarn in the 28th stitch. SC in every remaining stitch. Cut and tie off
R11: Reattach your yarn in the 17th stitch. SC in every remaining stitch (14)
R12: CH1 and turn. SC in each stitch (14)
Starting on row 13, there will be two sets of instructions. One for each remaining section of the sword (Hilt and Blade)
Hilt | Blade |
R13: CH1 and turn. DEC in the first stitch. SC in the next 3 stitches (4) R14: CH1 and turn. SC in each stitch until there are 2 remaining. DEC in the last two stitches (3) R15: CH1 and turn. SC in each stitch. Cut and tie off (3) | R13: Reattach your yarn in the 24th stitch. SC in each ST. Once you have reached the final stitch in the previous row, FSC 7 (14). R14: CH1 and turn. INC in the first stitch, SC in each stitch until there are 2 remaining. DEC in the last two stitches (14) R15: CH1 and turn. DEC in the first ST. SC until there is one ST remaining. INC in the last ST. (14) R16: Repeat step R14 |
BUSTER
R0: Using a 4.0 mm hook and your lightest silver yarn, CH4
R1: Starting in the second chain from the hook, work a SC in each in the back bump of each ST across (3). At the end of the row, CH38
R2: Starting in the second chain from the hook, SC in each ST. (40)
R3: CH1 and turn. SC in each stitch until there is 1 remaining. INC in the final stitch (41)
R4: CH1 and turn. INC in the first stitch. SC in each remaining stitch (42) At the end of the row, CH15
R5: Starting in the second chain from the hook, SC in each ST until there is 1 remaining. INC in the final stitch (57)
R6: CH1 and turn. INC in the first stitch. SC in each remaining stitch (58)
R7: CH1 and turn. SC in each ST until there is 1 remaining. INC in the final stitch (59)
R8: CH1 and turn. INC in the first stitch. SC 44 (46)
R9: CH1 and turn. SC in each ST until there is 1 remaining. INC in the final stitch (47)
R10: CH1 and turn. INC in the first stitch. SC in each remaining stitch (48)
R11: CH1 and turn. SC3. Cut and tie off (3)

MINATO'S KUNAI

R0: Using your black yarn, make a magic circle. Using a 4.0mm SC 9 into the magic circle. Slip stitch to join, but DO NOT tighten the circle.
R1: CH1 and turn. SC into the first 2 SC on the magic circle (2).
R2: CH1 and turn. INC in the first stitch, INC in the second ST (4)
R3: CH1 and turn. SC in each stitch (4)
R4-R14: Repeat step R3
R15: CH1 and turn. SC in each stitch (4) At the end of the row, CH3
R16: Starting in the second chain from the hook, SC in each ST. Once you have reached the final stitch in the previous row, FSC 2 (8).
R17: CH1 and turn. INC in the first stitch, SC in each stitch until there is one ST remaining. INC in the last stitch (20)
R18-R20: Repeat step R17
R21: CH1 and turn. INC in the first ST. SC 3. Cut and reattach the yarn in the 3rd stitch from the end of the row. SC in each remaining stitch until there is one ST remaining. INC in the last stitch. Cut and reattach the yarn in the 7th stitch. SC 6
R22: CH1 and turn. SC in each stitch (6)
R23-R24: Repeat step R22
R25: CH1 and turn. SC 4. DEC in the last two stitches (5)
R26: CH1 and turn. SC 3. DEC in the last two stitches (4)
R27-R32: CH1 and turn. SC in each stitch (4)
R33: CH1 and turn. SC 2. DEC in the last two stitches (3)
R34-R38: CH1 and turn. SC in each stitch (3)
R39: CH1 and turn. SC 1. DEC in the last two stitches (2)
R40: CH1 and turn. DEC. Cut and tie off (1)
KEYBLADE
R0: Using a 4.0 mm hook and your yellow yarn, CH12
R1: Starting in the second chain from the hook, SC in the back bump of each ST (11)
R2: CH1 and turn. INC in the first stitch. SC in each remaining stitch (12)
Starting on row 3, there will be two sets of instructions. One for each remaining section of the handle
Handle (Bottom) | Handle (Top) |
R3: CH1 and turn. INC in the first stitch. SC1 (3) R4-R6: CH1 and turn. SC in each stitch (3) | R3: Reattach your yarn in the second to last stitch. INC in the last stitch (3) R4: CH1 and turn. INC in the first stitch, SC in each stitch until there are 2 remaining. DEC in the last two stitches (3) R5: CH1 and turn. DEC in the first ST. SC until there is one ST remaining. INC in the last ST. (14) R6: CH1 and turn. SC 2 (2) |
R7: Reattach yarn in the first stitch on the bottom part of the handle. INC in the first stitch. SC the next 2 STs. FSC 11. SC into the top part of the handle. SC in the next ST. FSC 33 (50)
R8: CH1 and turn. SC in each stitch (50)
R9: CH1 and turn. SC in each stitch until there are 2 stitches remaining. DEC in the last 2 stitches (49)
Starting on row 10, there will be three sets of instructions. One for each remaining section of the handle, and one for the teeth of the key.
Key Teeth | Handle (Bottom) | Handle (Top) |
R10: CH1 and turn. SC11 (11) R11-R12: Repeat step R10 (11) R13: CH1 and turn, SC3 (3) R14: Repeat step R13 (3) R15: CH1 and turn. DEC in the first ST. SC 1 (2) Repeat steps R13 - R15 for the other two bumps on the key's teeth. | R10: Reattach your yarn at the bottom part of the handle. SC 3 (3) R11-R13: CH1 and turn, SC3 (3) | R10: Reattach your yarn at the top part of the handle. SC 2 (2) R11: CH1 and turn. INC in the first stitch, SC 1 (3) R12: CH1 and turn. DEC in the first ST. INC in the last ST. (3) R13: CH1 and turn. INC in the first ST. INC in the last 2 STs. (3) |
Handle (continued)
R14: CH1 and turn. DEC in the first ST. SC 1. FSC 8. Reattach yarn to the bottom part of the handle. DEC in the last ST (12)
R15: CH1 and turn. SC in every ST until there are two remaining. DEC in the last 2 STs (11)

MICKEY CHARM (optional)
Using a 3.0mm hook and silver yarn, make a magic circle. SC5 into the MC and tighten.
Repeat the previous step to make a second small circle.
Make a magic circle. SC8 into the MC and tighten.
Sew these three circles together in the shape of a Mickey head.
CH 10 and use this chain to attach the Mickey charm to the hilt of the keyblade.
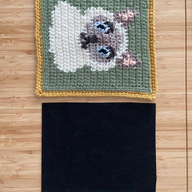
BLOCKING
For a clean final look with even stitches, blocking your piece is recommended before adding the backing. For acrylic fibers, steam blocking is recommended. For natural fibers (cotton, wool, etc.) wet blocking is recommended.
ADDING THE BACKING
Cut a piece of stiffened felt that is slightly smaller than the portrait and does not hang over the edges
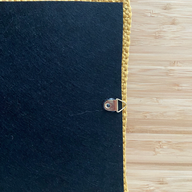
Using hot glue or E6000, glue stiffened felt to the back of your piece
Place something heavy on top of the portrait and allow the glue to dry completely.
Cut out the felt so that it is the same shape as your crochet piece.
Once the glue has dried, place a small dot of glue in the center of the hilt, then press the triangle d-ring hanger into this dot of glue and allow it to dry.


Comments