Purrfect Portraits
- Aidan Wells

- Aug 20, 2023
- 3 min read
Updated: May 24, 2024
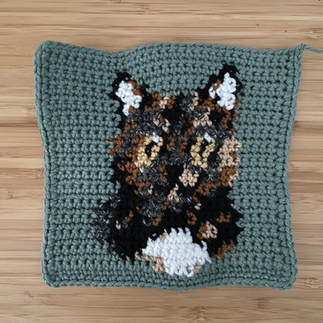
The final portrait will measure approximately 7"x7" if you use worsted weight yarn. Be sure to tag me on instagram or tiktok and use the hashtag #PurrfectPortrait if you decide to make any of them! The files can be downloaded at the end of this post. If you like this pattern, feel free to support me on my ko-fi!

DIFFICULTY LEVEL/SKILLS REQUIRED
Difficulty: Intermediate/Experienced (maker should be comfortable with color changes and handling multiple colors of yarn at once)
You will need to know the following techniques:
Color Change
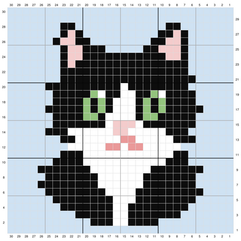
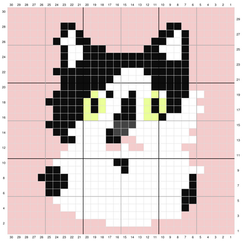
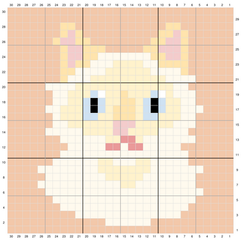
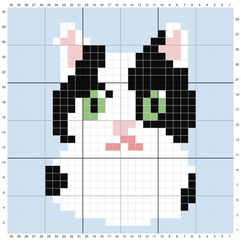
Reading a color chart
SC in the back loop only
GAUGE
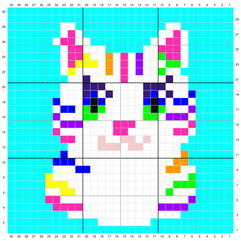
Each square (30 rows of 30 SC) should measure approximately 7”x 7” when blocked
MATERIALS
YARN
Weight 4, Any Brand
HOOK
4.00 mm
ADDITIONAL MATERIALS
E6000 glue
Stiff Felt
Scissors
Tapestry Needle
SHORT TUTORIALS
METHOD
ABBREVIATIONS
CH - Chain
SC - Single Crochet
DC - Double Crochet
ST(s) - Stitches
PATTERN NOTES
The pattern uses US terminology
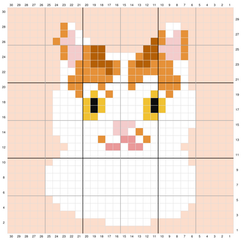
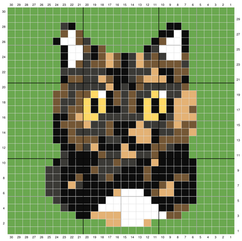
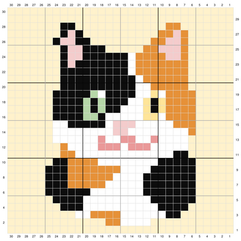
Each box in grid pattern represents one single crochet
The pattern is worked in rows.
The pattern is worked from the bottom up.
The turning chain does not count as the 1st stitch of the row.
CREATING THE PORTRAIT
Using a 4.0 mm hook and your background color yarn, CH 31
Starting in the second chain from the hook, work a SC in each in the back bump of each ST across (30).
Work rows 2 to 30 in SC, changing colors where indicated by the color charts at the end of the page.
Once you have finished row 30, CH 1 and turn.
Using the background color, add a SC border all the way around by placing one SC in each stitch on the top and bottom and 1 SC in each row on the sides.
ADDING THE "FRAME"
Shell Stitch Border
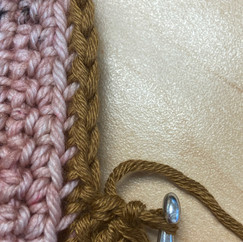
Using your frame/border color, place one single crochet in the back loop only all the way around the portrait. You can start in any stitch.
Slip stitch to your starting SC. SC 1 in the first stitch of the second round
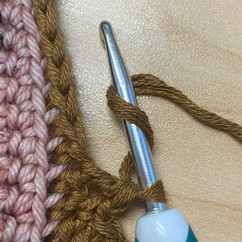
Skip 1 st, 5 dc in the next st, skip 1 st
*SC in the next st, skip 1 st, 5 dc in the next st, skip 1 st; rep from * all the way around to create the scalloped frame
On the last DC cluster, cut and pull the yarn all the way through. Tie off the stitch
Using a tapestry needle, attach this cluster to the first cluster in the round and weave in the tail
Single Crochet Border
Using your frame/border color, place one single crochet in the back loop only all the way around the portrait. You can start in any stitch.
Slip stitch to your starting SC. SC 1 in the first stitch of the second round
SC 1 in each stitch all the way around. Slip stitch to join the round.
Cut and tie off then weave in the tail OR repeat steps 2-3 as many times as preferred for a thicker border.
BLOCKING
For a clean final look with even stitches, blocking your piece is recommended before adding the backing. For acrylic fibers, steam blocking is recommended. For natural fibers (cotton, wool, etc.) wet blocking is recommended.
ADDING THE BACKING
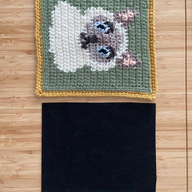
Cut a piece of stiffened felt that is slightly smaller than the portrait and does not hang over the edges
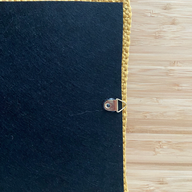
Using the E6000, add glue to one side of the felt following the same pattern shown in the photo below
Place the glued side of the felt onto the wrong side of your portrait. Place something heavy on top of the portrait and allow the glue to dry completely.
Once the glue has dried, place another small dot in the center of the top side of the portrait, then press the triangle d-ring hanger into this dot of glue and allow it to dry.




























Hi, I was just wondering what happened to all of the other grid patterns you had posted?